
How to take Screenshot in Laptop Windows 7 10 11
Screenshots are one of the most essential tools for any content marketer. They allow you to capture important moments or details for future reference, as well as to share your work with others. If you’re not comfortable taking screenshots on your laptop, then you may be missing out on one of the best ways to improve your content marketing. In this blog post, we’ll teach you how to take a screenshot on a laptop in just a few easy steps.
How to take screenshot in laptop
In this tutorial, we will show you how to take a screenshot on a laptop. The most common way to capture an image of your computer is to press the “PrintScreen” key on your keyboard. However, this procedure may not be available on all laptops. If you are having difficulty capturing an image with PrintScreen, you can try another keyboard shortcut such as “F5” or “Shift-F5”.
Once you have found the correct key combination for your laptop, follow these steps:
- Click on the “Windows” logo in the bottom left corner of your screen.
- Click on “Start.”
- Type “screenshot” into the search bar and hit enter.
- A window will open that displays all of the screenshots that have been taken since your computer was last restarted.
- Select the screenshot that you want to capture and click on “Save As.”
How to take screenshot in laptop
There are a few different ways to take a screenshot on a laptop. The most common way is to press the “PrintScreen” key on your keyboard and then paste it into a photo editor like Photoshop or GIMP.
- Another way to take a screenshot is to open the “Snipping tool” from the Windows 10 taskbar, and then drag the cursor over the area you want to capture. You can also use the “Windows+PrtScr” keyboard shortcut.
- If you’re using a Mac, you can use the “Command + Shift + 3” keyboard shortcut to take a screenshot.
- Finally, if you’re using an Android device, you can use the “Screenshot” button from the main screen of your phone’s menu bar.
How to take Screenshot in Laptop Windows 7 10 11
How to capture full screen screenshot in laptop
There are different ways to capture a full screen screenshot in laptops. One is to use the built-in screenshot function of the laptop itself. Another way is to use third party apps such as Screengrab or Snagit.
First, open the app you want to use and select the option to take a screenshot. On some laptops, you may need to press a specific key combination before taking the screenshot such as F2 on a Lenovo laptop.
Once the screenshot is taken, it will be saved in whatever folder you selected in the app.
How to take a screenshot of a specific part of the screen in laptop
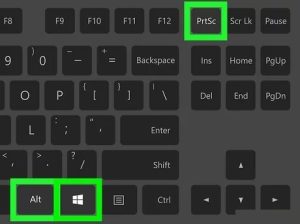
There are a few different ways to take screenshots on laptops. One is to press the Windows key + Print Screen (PrtScn) at the same time, which will capture the entire screen.
You can also use some of the screenshot tools that come with Windows: Snipping Tool, Edit menu > Cut and Paste > Screenshot.
Or alternatively, you can use a third-party app such as OBS or XSplit Gamecaster to take screenshots automatically.
Conclusion
In this article, we are going to teach you how to take a screenshot on your laptop. Screenshots can be very useful for documenting what has happened on your screen or sharing an important message with someone else. We will show you how to take a screenshot on a Mac, Windows, and Chromebook.
